Pine nut and dulce de leche cookies

Pine nut - dulce de leche cookies

“A poem begins with a lump in the throat” – so said Robert Frost. And while these cookies are far from being a poem, they also began with a similar lump in the throat. Things have not improved that much since my last rabbit post, hence the lack of recipes. But yesterday, after a day of doing pretty much nothing and pleading guilty to myself of intense wallowing, I decided, with the lump in my throat, that it was time to pay my kitchen a much needed visit. And as I could not muster enough energy to chop chocolate or did not feel adventurous enough to bake a cake, I made up a quick-cookie recipe. Now, these are made with pine nut dulce de leche, (or cajeta, as we call it in mexico) but you could use any dulce de leche you can find, and add the pine nuts, previously roasted. Pine nuts have always been, in my opinion, funny tasting. But these cookies, while different from  any others that I’ve tried, proved to be a success with both my mom and my friends.

Here follows the recipe:

Pine nut and dulce de leche cookies
(Own recipe)
Makes aprox. 24 cookies.

1 cup butter
1/4 cup brown sugar
Pinch of salt
1/2 tsp baking powder
1 egg
1 1/2 cups  flour
3 tbsp dulce de leche
2 tbsp roasted pine nuts

Directions

Preheat the oven to 350ºF. Lightly flour two baking sheets.

In a bowl, mix the flour, salt, and baking soda. Separately, using the whisk attachment of your mixer, cream together the butter and sugar until fluffy. Add the egg. Slowly incorporate the flour mixture. When fully mixed, using a spatula, mix in the dulce de leche and pine nuts, not mixing entirely but leaving it in swirls. Drop by spoonfuls on your cookie sheets and bake until golden brown, about 12 minutes.

These are really good served with vanilla ice cream.

Pine nut cookies before baking


Earl Grey Square Cookies

Earl Grey Square Cookies

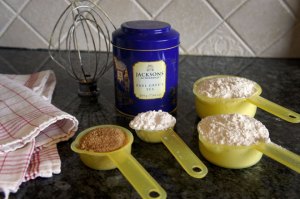
Everyone loves cookies right? I don’t think I’ve ever actually met someone who doesn’t. At least some kind of cookie. Either crunchy, chewy, healthy, sugary, buttery…there’s a cookie for everyone. Me, I’m not hard. I love them all. (except possibly any cookie with aniseed. I just think it’s one of those flavors that ruins everything else) And I really love these. I’d been wanting to make tea cookies ever since I tasted them on a teashop in Switzerland, and since I tried out a matcha cookie batch with a couple of friends last week, I decided to give a try to earl grey. The recipe is my own invention after the fiasco with the matcha cookies, and apparently a good one, because out of the 40-something I made only 5 remained after an afternoon of tea with my friends from school. (Who, I think is worth mentioning, are forever on a diet).I used earl grey from a huge tin my mom bought a couple of years ago and we just cannot seem to finish it, probably because we keep buying more, but I’m pretty sure you can use the stuff in the teabags. Anyhow, on to the extremely easy recipe.


Earl Grey Square Cookies

(Own recipe)

1/4 cup brown sugar
1/8 cup icing sugar
2 tsp. earl grey, finely ground (you can do this with your fingers)
125 g. butter, room temperature
1 1/2 cups all purpose flour
Pinch of salt
1 egg


Directions

In a mixing bowl, mix together the earl grey, salt and flour. In the bowl of your mixer using the whisk attachment, cream the butter and brown sugar until light and fluffy. Add the icing sugar and beat some more, until lighter and fluffier. Switch to the paddle attachment and add, in two or three steps, the flour mixture. As soon as it’s all  incorporated, add the egg and mix until just combined. (do NOT overmix). Place your dough in the work surface and finish giving it shape, until you can turn it into a long log, about 4 cm thick. (If it’s too soft you can stick in the fridge for a bit) Place the log of dough on a long rectangle of wax paper, and covering it with it, flatten the sides against the work surface until they are square. (You can use a big knife, or a pastry scraper, to help  you flatten the sides) Place the dough, still wrapped in the wax paper, in the freezer for about 20 to 30 minutes.
Meanwhile, preheat your oven to 360ºF.

Remove the square log of dough from the freezer and using a paring knife, cut slices of about 1 cm (or a pinky finger) and place them directly on a baking sheet. Let the sliced cookies rest for 5 minutes, and then bake until slightly golden brown.

Serve with hot tea and milk.

Earl Grey Square Cookies

Chocolate chip cookies – for a break up

Chocolate Chip Cookies

There’s nothing more comforting than chocolate. Especially when it comes right out of the oven after having been mixed with sugar, butter and flour. I made these just after finding out one of my best friends was in need of some of the aforementioned comforting – after a break up. It is so far the best recipe I’ve tried for chocolate chip cookies (probably because its my own recipe, after several modifications to several recipes). Crunchy on the outside but very soft on the inside, tons of chocolate, and just the occasional walnut bit -every other bite or so.

They’re quick to make, quick to bake, and quick to put a smile, even if a small one, on a sad face.

Anyhow, here’s the recipe:

Chocolate chip cookies
(Own recipe)

Yield: 36 medium cookies

2  1/2  cups all-purpose flour

1 teaspoon baking powder

1/2 teaspoon salt

1 cup (2 sticks) butter, softened

1  1/3 cup brown sugar

1/2 teaspoon vanilla extract

2 large eggs

1 tablespoon milk

2 cups roughly chopped semi-sweet or milk chocolate (keep the chunks big)

2/3  chopped walnuts

Directions:
Preheat the oven to 360ºF
Place the softened butter along with the brown sugar in the bowl of your mixer, and using the whisk attachment, beat on medium speed until light and fluffy. While this happens, sift together the salt, baking powder and flour in a separate bowl. Return to your butter (now light and fluffy) and add the eggs, one at a time, and finish with the milk and vanilla. Switch to low speed and add, a little at a time, the flour mixture. Using a spatula, mix in the chocolate and walnuts, until evenly spread out.

Using your hands, form medium sized balls and flatten slightly on baking sheets. Bake until slightly golden at the edges. (I don’t use times, since each oven is extremely different! If yours tends to heat unevenly, like mine, rotate the baking sheets after about 5 minutes in. I think mine took about 10 in total)